BLOGGER TEMPLATES AND TWITTER BACKGROUNDS
Showing posts with label holiday. Show all posts

Tuesday, December 13, 2011

Apple Tea Ring or Pineapple Tea Ring

This was taken before I frosted it.  Ignore my ugly pan and I know it doesn't look that good, but it really was. 
Dough

1 lb butter
1 cup sugar
4 eggs
5 cups scalded milk
3/4 tlbs of sea salt
1 tbs yeast/ dissolved in 1/2 cup warm water

Filling
1 15 oz crushed pineapple or canned apples
1/2 cup brown sugar
2 Tbs cornstarch
1/2 tsp cinnamon
You can also use granola, craisins, or raisins.

Enough flour to have a sticky dough.  Let rise until doubled.
Scald milk and butter.  Add to mixture.  Add sugar, beaten eggs, and salt.  When all mixed together and yeast mixture.  Roll out dough as for cinnamon rolls.  Cover with filling.  Form into a circle and then pinch ends together.  Cut with scissors 3/4 thru and then turn cuts up on side to form a wreath.  Cook at 350 until golden brown, about 20 mins.  Frost with butter cream frosting.  You may also decorate with almond or maraschino cherries.

You can also just used butter, and cinnamon and sugar.  Then shape your dough into three ropes.  Braid them and then shape them into a candy cane.

Saturday, October 22, 2011

Candy Corn Sugar Cookies

Ingredients:
1 batch sugar cookie dough (like this one or this one)
yellow and orange food coloring

Optional:
Sanding sugar, coarse raw sugar, or sprinkles
almond bark or white chocolate, melted

Instructions:
Divide prepared sugar cookie dough into three equal portions.  Leave one as is and color one other portion yellow and another portion orange.
Line a standard loaf pan with plastic wrap.  Gently press layer of uncolored dough into bottom of pan and smooth flat, keeping it at least 1/2-3/4 inches high (you don’t have to use the whole pan if you have a small batch of dough) or larger if desired.  Layer orange dough on top of previous layer and smooth.  Finally layer yellow dough and smooth on top.  Wrap plastic over dough and chill until firm, 30-60 minutes in freezer or 1-2 hours in fridge.  Or you can store the dough in fridge for 2-3 days before baking.
Remove plastic and slice loaf into 1/4 inch slices. Trim top of slice to make straight line.  Cut each slice into triangle shape and dip top side in sugar if desired.  Bake according to sugar cookie directions.  Cool completely and then if desired, dip ends in almond bark or white chocolate and decorate with sprinkles.

I found this recipe here.

Monday, July 4, 2011

Berry Cobler

We found this recipe here.  We made this for the 4th of July.  It was red, white, blue, and delicious.

3 c. all-purpose flour, lightly spooned into the measuring cup and leveled with a knife
1/4 tsp. table salt
2 1/2 Tbsp. baking powder
1 1/4 c. sugar
1/2 c. (1 stick) salted butter
2 eggs
1 c. heavy cream ( I used milk)
zest of one lemon or orange (optional)
4 c. berries (We used blueberries, and strawberries)
1/2 c. brown sugar
Streusel Topping:
1/2 c. sugar
1/4 c. + 1 Tbsp. flour
1 tsp. cinnamon
4 Tbsp. butter at room temperature
Preheat oven to 350. Lightly grease a 9×13″ baking dish and set aside.
In a large mixing bowl, whisk together the flour, salt, baking powder, sugar, and citrus zest. Set aside.
Using a cheese grater, grate 1 cold stick of butter. Lightly toss the butter with flour mixture until it’s mixed evenly and crumbly (don’t over-mix here). Whisk the eggs and then lightly toss them with the flour/butter mixture until evenly absorbed. Add in the cream and mix until combined; the mixture should be quite sticky and a little lumpy (kind of like biscuit dough). Lightly press about 1 1/2 c. of the dough mixture into the bottom of the prepared pan and set it aside.
Toss the berries with the brown sugar and spread it over the prepared “crust.” Drop the remaining dough over the berries and set aside.
Whisk together the sugar, flour, and cinnamon for the struesel topping. Cut in the butter until the mixture is crumbly. Sprinkle over the dough and bake for 45-55 minutes or until the top is golden brown and the crust is cooked through. Serve warm with whipping cream or vanilla ice cream.

Wednesday, June 22, 2011

4th of July Shirts

Landon's Shirt

Lindsay's shirt
The kids and I got together with some friends today to Tye Dye shirts for the 4th of July.  We used the spray kind of dye and they were so easy and so fun.  The kids got a little carried away so in some spots they look more purple than red, white, and blue.  But, they had fun and can't wait to wear them so that is all that matters.

Sunday, April 24, 2011

Bunny Buns

bunny buns


This recipe was in the friend this month.  We made them today and they were so yummy.

Bunny Buns

1 package active dry yeast
1/4 cup warm water
1 cup milk, warmed not quite to boiling
1/3 cup sugar
1/2 cup shortening
1 teaspoon salt
2 eggs, beaten
1/4 cup orange juice
2 tablespoons grated orange peel
5 1/2 cups flour, sifted
Glaze: 2 cups powdered sugar, 1/4 cup hot water, 1 teaspoon butter
  1. Wash hands with soap and water.
  2. Sprinkle yeast in the warm water and set aside.
  3. In another bowl, blend milk, sugar, shortening, and salt. Cool until lukewarm, then add eggs, water with yeast, orange juice, and orange peel.
  4. Stir in flour a few cups at a time to make a soft dough. Let stand for 10 minutes.
  5. Knead dough 5–10 minutes on a lightly floured surface until dough is smooth and elastic. Place it in a lightly greased bowl, turning once to grease surface. Cover bowl with a clean towel and put it in a warm place. Let dough rise for 2 hours, or until double in size. Punch dough down and let stand for 10 minutes.
  6. On a lightly floured surface, roll dough into a rectangle 1/2 inch thick. Cut dough into strips 1/2 inch wide and 14 inches long. Roll between hands into rounded snake shapes. Cut one strip into pieces 1/2 inch long, and roll into balls.
  7. Place one long piece of dough on a greased cookie sheet. Place one end of the strip over the other to make a loop; bring the end that is underneath up and cross it over the other end. Place a ball of dough on top of the bottom loop.
  8. Cover bunnies and let rise in a warm place for 45–60 minutes, until nearly double in size. Bake at 375ºF (190ºC) for 12–15 minutes.
  9. For the glaze, stir powdered sugar, water, and butter together. Frost bunnies with the glaze while they are still warm.

Monday, March 28, 2011

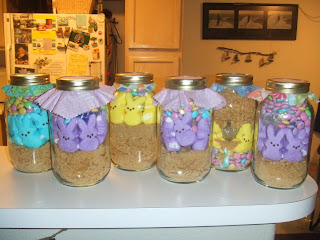
Easter Bunny Smores in a Jar


You will need:
1 sleeve of graham crackers crushed.
6-8 peeps
1/3 cup of brown sugar
1 cup pastel colored M&M's
1 qt mason jar
fabric and ribbon for the top of your jar, and paper to print out the instructions.

Easter Bunny Smores
Empty the contents of the jar into a bowl.  Snip the bunnies into pieces and return to the mix.  Add 1/2 cup melted butter and 1 tsp of vanilla and mix well.  Pat into a greased 9X9 inch pan.  Bake at 350 degrees for 15 mins.  Cool and cut into bars.  You can also leave the peeps whole and just place them on top of the mix before baking.

I saw this idea here.  I thought they were so cute.  I decided to make them for the people that Pete home teaches, and the ladies that I visit teach.  The ones I made first weren't quite as cute.  They are the yellow ones.  Later I figured it was better to layer the graham crackers first, then the peeps.  I put the brown sugar in a sandwich baggie and then stuffed that in the middle between the peeps.  I put the M&M's on top.  Then I just cut some spring looking fabric from my scraps to add to the top.  After the picture was taken I attached the recipe using ribbon and a hole punch.  Super Easy and Super Cute!

You could do these for any holiday using the other kinds of holiday peeps and colored M&M's.

Friday, March 4, 2011

Leprechaun Hands


The kids and I made these little Leprechauns with their hand prints today.  They didn't turn out as cute as I had pictured them in my head, but they had fun and that is all that matters.

Wednesday, March 2, 2011

Dr. Seuss Birthday

We had a fun Dr. Seuss Day on Dr. Seuss's Birthday (March 2nd).  You could also do this for St. Patrick's Day, or just any day you want to share some good stories and fun with your kids.
We started out by reading a few of our favorite Dr. Seuss Books.  We had a few and also checked out a few from the library.


After our story time we colored some pictures I got off the internet.  I just googled Dr. Seuss coloring pages and found lots.


 Aren't they cute!


The finished product

Then we watched the movie that we found at the Library.  It actually had a few stories.


We made snacks to go with our lunch.  Pretzel sticks with a little bit of melted white chocolate chips.  I just put about a 1/4 cup of white chocolate chips in a sandwich baggie.  I melted them for a few minutes in the microwave, making sure I stopped every 20-30 seconds and squished the bag a little.  Then I just snipped a little off of a corner of the bag and squeezed the chocolate onto the pretzels.  Then we topped them off with a green M&M's and put in the fridge til the hardened.
Then we enjoyed our lunch of green eggs and ham with our little snacks we made.  For the Green Eggs and Ham, I just made scrambled eggs with a little diced ham in them.  I also added a little bit of green food coloring, milk, salt and pepper.

We had a lot of fun.


Dr. Seuss Day was a success.  Here are the smile on my kids (all decked out in their greens) to prove it.

Thursday, December 16, 2010

Reindeer Christmas Cards

Lindsay made these cute Reindeer cards with her Joy School class. I thought they were so cute we would post a picture of them. They made them with their hand prints and then used their fingerprints to make the border.


Tuesday, December 14, 2010

Christmas Ornaments

These cute ornaments were made by my children with a little help from one of the cute ladies in our ward. She is the one that had the little Christmas Party for them the other night. We got these ornaments at church on Sunday. Lindsay and Landon were so proud to show us.
The pictures I took of them are not the greatest, but you get the idea.


Tuesday, December 7, 2010

Snowmen

We live in the desert and because of that, we miss out on snow. We have had a few dustings of snow in the last 7 1/2 years we have lived here, but not a real snow that you can play in and build snowmen with. So, we have to be creative when it comes to Winter fun. I don't miss the scraping of sidewalks, or driving in blizzards, but I do miss playing in the snow.
My kids and I decided to have our own snowmen night.
We started out our night reading this fun book called "Snow Friends." It is about some little animals that build a snowman to play with.


Then we had our snowmen dinner. We found some great recipes in a Taste of Home Test Kitchen cook book. We had Snowman Party Stew, and Cauliflower Snowmen.

Snowman Party Stew
1 pound of ground beef
1 package frozen veges
1 can beef gravy
2 cups mashed potatoes with a small amount of milk
16 whole black peppercorns
1/4 cup ketchup

In a skillet, cook beef until no longer pink. remove 24 peas and one carrot chunk from the stew vegetables and set aside. Add remaining vegetables to beef. Cook until veges are thawed. Add gravy; mix well. Pour into an ungreased 9 in pie plate. Top with eight mashed potato snowmen, using 1 tbsp of potatoes for each head, and 3 tbsp for each body.

Bake uncovered at 350 degrees for 20 minutes. Cut the reserved carrot into eight strips. Insert one strip into each snowman for a nose, place reserved peas on each for buttons. Add peppercorns for eyes. Drizzle ketchup between head and body to form a scarf.


Cauliflower Snowman
6 cups cauliflower
1/4 cup diced white onion
1/4 cup butter
1/3 cup all-purpose flour
2 cups milk
1 cup shredded swiss cheese
1 tsp salt
1/4 tsp garlic salt
1/4 tsp white pepper
10 whole ripe olives
1 baby carrot

In large saucepan, cook cauliflower in a small amount of water for 6-7 minutes. Drain.

In medium saucepan saute onion in butter for 2 minutes. Stir in flour until blended. Gradually add milk. Bring to a boil and boil for 2 minutes. Remove from heat; stir in cheese until melted. Add salt, garlic salt, and pepper.

Place half of the cauliflower in a greased 2 1/2 qt baking dish; top with half of the sauce. Repeat. Bake, uncovered at 350 degrees for 20 minutes or until bubbly. Add olives for eyes and mouth and carrot for the nose.

After dinner, we had these cute snowman doughnuts we found at the bakery at Walmart. There were lots of cute recipes for snowman treats online though too. You could google snowman treats if you don't find the doughnuts.

After dinner we made these cute ornaments. I found the idea here.

I found the red ornament at the dollar store. I painted my kids hands with white paint. Then I had them carefully place their hands around the ornament. Once the paint dried, I used sharpies and added a few eyes, nose, mouth, buttons, and a scarf to turn their fingers into snowmen. They turned out really cute.

Then after a the kids got out of their warm bath (the painting was kind of messy) we curled up on the couch to watch "Frosty the Snowman."

We had a great night, pretending we played in the snow.

Wednesday, December 1, 2010

Christmas Thumbprint Art

I saw a great idea here and thought I would try to make the little thumbprint trees with my kids. Then I got a Current Catalog in the mail and saw these cute snowmen and reindeer made out of thumbprints and thought we would try them too.
The kids had a blast and Daddy even went along with it. I made cards. You could also easily cut them out individually and glue them to a mason jar lid. Add some ribbon and make ornaments too.
My pictures aren't the greatest, but you get the idea. We just dipped our thumbs in black ink, and green paint. Then I just drew around it to make the snowmen and reindeer. For the trees I just used markers to draw ornaments and added a gold star on top.

Our little Snowmen Family


Our little Reindeer Family


Our little forest of Christmas Trees

Wednesday, November 3, 2010

Paper Hand and Footprint Turkeys

We babysat several extra kids yesterday and it was kind of crazy. I was trying to keep them in one spot and contain the craziness to one area, and do something fun too. We made these cute turkeys. The body of the turkey is their footprint and then the feather are 6 hands. I let the kids pick three different colors for their hands and then they decorated their feet. Landon wasn't too excited about his so I decorated his.

Lindsay's Turkey


Landon's Turkey

Thursday, October 28, 2010

Witches Hats

Lindsay had a Joy School Party today and they made these cute little Witches Hat. It is just an ice cream cone glued (with frosting) to a little piece of construction paper cut into a circle. The inside is filled with cereal, marshmallows, and m&m's.


Bloody Cups

I can't remember where I saw this. It looked kind of fun and they were really easy. I mixed corn syrup on a plate with red food coloring. Then I dipped the top of the cup into the syrup. Then you sit the cup up and let it drip as long as you want it to. Then put it in the freezer to stop the dripping. Spooky!


I also made some kid friendly with plastic cups for the kids.


Friday, October 22, 2010

Bat Hands

My kids were given a little Halloween activity book last year somewhere. I ended up just throwing it in with all of the decorations last year. This year we found it and today the kids colored a few pictures and we made some cute little bats out of their hands. I also saw that you could use a foot print as the body and use googly eyes on it to make the bat face. I think they turned out pretty cute. We hung them up and the kids are pretty proud of them. Don't you love how Lindsay's bat has a belly button and painted toe nails?


Halloween Chex Mix


8 oz white chocolate baking bars, coarsely chopped (I used white chocolate chips)
4 cups corn chex or rice chex cereal (I used a mixture of both)
2 cups bite size pretzel twists
1/2 cup raisins
1 cup candy corn
1/4 cup orange and black candy decors

In large microwaveable bowl, microwave chopped baking bars uncovered on High for 1-2 minutes stirring often until melted and smooth.

Gently stir in cereal, pretzels, and raisins until evenly coated. Stir in candy and decors.

Spread on wax paper or foil until cooled and chocolate is set. Break into chunks. Store loosely covered.

Tuesday, October 19, 2010

Ghost Feet

Today we added some feet ghosts to our hand ghosts. They loved this!


Monday, October 18, 2010

Ghost Hands

The kids and I made little ghosts out of their hands the other day. They turned out pretty cute. I was going to use black paint on their thumbs to make eyes and a mouth, but my black paint was to watery for some reason. So we used a sharpie instead.

We may try again using their feet. I think they may look more like ghosts.


Saturday, July 3, 2010

4th of July Cupcakes

We made these cute cupcakes for the fourth of July. I think they turned out better than my first attempt. We used the paste food coloring and it turned red instead of pink. So fun!